
Is Auto Bed Leveling Sensor Necessary?

In 3D printing, bed leveling is one of the decisive factors of a successful print piece. If your building platform is uneven, the nozzle may be too close to the building platform and fail to extrude the filament or the filament won't attach to the platform tightly. Eventually, your printout will defeat. Besides, the first layer thickness and Z-offset, these two factors are also critical factors in 3D printing. A successful first layer is a good beginning of the printing, and the right Z offset is maintenance. All these good results start from fine bed leveling.

The nozzle is too high or too low causing unsuccessful printing.
Picture from Pick 3D Printer
We used to adopt the manual bed leveling technique. The operating mode is determined by firmware. In general, there are four screws downside around the heat bed. No matter which devices you use, all you need is just an A4 paper. Let's take the BIQU Hurakan (Klipper firmware) and BIQU BX (Marlin firmware) 3D printers as examples.
Manual leveling process details
In Hurakan (Klipper firmware)
Step 1: Choose "Control", then select "Manual Level", and click the "Clear mesh". Attention please, only if you click the "Clear mesh", can you choose all the direction options.
Step 2: Put an A4 paper between the nozzle and the heat bed.
Step 3: Adjust the heat bed screws on the four sides and center areas. Start from the left-front, and drag the paper to see whether there exists resistance. It's best to have a little obstruction when pulling out. If the paper is hard to drag, loosen the screw on left-front. On the contrary, if the paper is too easy to withdraw, tighten the screw on this side. Then use the same way to test the right-front, right-back, left-back, and center in sequence. Attention, the center point calibration should adjust the four screws at the same time. Repeat this step 2 or 3 times.
Step 4: Until the resistance of every point is almost the same, the manual leveling is done. Now your building platform is level flatting.


In BX (Marlin firmware, two ways)
Method A:
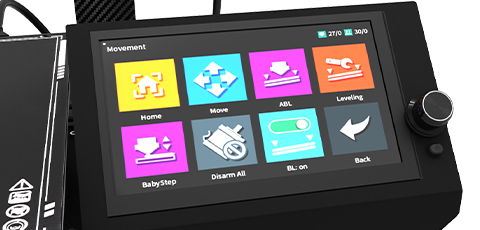
Step 1: Choose "Movement" in the menu, click "Home", then choose "Disarm all", which means you could freely move your extruder by hand.
Step 2: Put an A4 paper between the nozzle and the heat bed.
Step 3: Then carefully and slowly move the extruder to the four corners and central part in case the motor creates a charge when moving. It's best to have a little obstruction when pulling out the paper. If the paper is hard to drag, loosen the screw of its position downside the heat bed. On the contrary, if the paper is too easy to withdraw, tighten the screw. Use this way to test the left-front, right-front, right-back, left-back, and center in sequence. Attention, the center point calibration should adjust the four screws at the same time. Repeat this step 2 or 3 times.
Step 4: Until the resistance of every point is almost the same, the manual leveling is done. Now your building platform is level flatting.

Method B:
Step 1: Choose "Movement" in the menu, click "Leveling"
Step 2: Put an A4 paper between the nozzle and the heat bed.
Step 3: Test the distance between the nozzle and the heat bed. Separately click the 4 points and S point buttons, and the extruder will automatically move to these locations. Drag out the paper to see if there is a little pulling tension. If the paper is hard to drag, loosen the screw of its position downside the heat bed. Otherwise, if the paper is too easy to withdraw, tighten the screw. Use this way to test all 5 points in sequence. Attention, the center point calibration should adjust the four screws at the same time. Repeat this step 2 or 3 times.
Step 4: Until the resistance of every point is almost the same, the manual leveling is done. Now your building platform is level flatting.

The old-fashioned manual bed leveling technique is still helpful in any situation today. If your 3D printer has been frequently utilized, please use one-time manual leveling once in a while, and then do the auto leveling again to make sure your printing is successful.
The strength of auto-leveling
a) Easy to set up and friendly to novices:
Generally speaking, auto-leveling takes about 5 minutes on average. Some good auto-leveling sensors even take 1 minute and 30 seconds to finish auto-level process without heating the platform or extruder, such as the BIQU MicroProbe. We all know that 3D printing can consume a lot of time, so it is better to shorten the preparation time.
b) Compensation for problems caused by uneven surface of the heat bed:
Manually level the heat bed so that the heat bed is parallel to the xy plane of the printer. While the auto-leveling module can compensate for the uneven surface of the heat bed, so that the height of the print head on the first layer is always kept at the same distance from the surface of the heat bed.
c) Auto-leveling will be more informative in certain situations:
Manual leveling is judged by human eyes however our eyes can sometimes lie, while auto-leveling sensors use inductive, capacity or physical-Hall effects to make bed leveling more precise. So auto-leveling will be more informative up to a point.
Auto-leveling is a step after manual leveling which is indispensable for 3D printing. By combining auto-leveling with manual leveling, our printing accuracy can enter a higher level.
Let's explore the auto-leveling sensors further. Here list 3 popular sensors.
Auto-leveling sensors
1. MicroProbe

BIQU MicroProbe
Its weight is only 6g and the length of it is 28.3mm (including the probe extension). It carries 0.001-0.003mm accuracy, higher than most leveling sensors. And it has a 10,000,000 times service life, economizing on your accessories replacement fee. And it can be widely used on kinds of material heat beds, such as PEI, silicon glass, wood, metal, etc.
Size: 27.9*15.6*28.3mm (including the probe extension)
Weight: 6g
Accuracy: 0.001-0.003mm
Price: around $30
2. BL touch

ANTCLABS BL touch
It's one of the most popular leveling sensors, possessing 0.005mm accuracy. It has a plastic outlook, is 46mm long (when the probe extends), and is 10g weight. BL Touch works by using a solenoid to control the probe and moves down until the Hall effect sensor detects the bed, then the probe retracts, and repeats. And the sensor can compensate for your print height when you print. It could work with various bed materials, such as glass, wood, metals, etc.
Size: 26*11*44mm (including the probe extension)
Weight: 10g
Accuracy: 0.005mm
Price: around $40
3. Inductive

Twidec Inductive
The inductive, a non-contact device, consists of a small metal cylinder with a rubber tip, which determines an object's proximity through the change of magnetic fields. Due to its magnetic induction, it is more precise and reliable than other kinds of probes. It is about 66mm long (including the probe extension) and has 44g weight. It can charge a coil of wire, and measure the wire's current. However, it can only detect metal build plates.
Size: 62mm long (including the probe extension)
Weight: 44g
Accuracy: no data
Price: around $15
In the end
Now, do you have any idea about purchasing an auto-leveling sensor? It has an excellent performance in bed leveling, and can also improve your printing efficiency. An automatic leveling sensor is the stuff of the trend of the times, and a useful helper. However, please don't forget that manual leveling is the foundation of all. Sometimes the probe can't detect and adjust the seriously uneven platform. Automatic and manual have a close relationship and supplement each other.
Where Can I Get more Information?
3D printers are hot selling around the world. Here are the BIQU Community, and Download Center, where you can search about 3D printers' news or problems solution. If you have any questions, welcome to submit a request to our official website, we will soon settle your problem.
Community & Free 3D Model Files https://biqu3d.com/pages/community
Download the Firmware File https://biqu3d.com/pages/download
Submit a Request https://biqu3d.com/pages/submit-a-ticket
Now there are some general tips for you!
1) You could ask for some advice from a person whom you know, with a fund of professional 3D printer knowledge.
2) If you want to purchase BIQU products, welcome to view BIQU Store!
3) There are some labs, workshops, and maker spaces, where 3D printers are available for trial.
4) You should choose the fittest 3D printer on your own eventually. Considering your demands, work environments, and finances.
5) Whichever company or products you would like to select, please remember to know their sales service and technology support, and even the quality of the accessories and filaments, for they may be an expensive payment.
What's more
If you would like to learn more about the technique and trend of 3D printing and get first-hand information about our new arrivals or discount, you could subscribe to our newsletter!