
10 Tips for Improving the Accuracy of 3D Printing

What is printing accuracy?
Dimensional accuracy refers to how accurate the dimensions of the 3D printed project are compared to those of the digital model, and this measure is usually expressed as a percentage or in millimeters, such as ±1% or ±0.5 mm. As we all know, 3D printing could turn the objects on a computer screen into real ones. Till now, people are pursuing more and more exquisite models, not stuck in rough one. Some for a beautiful appearance, and some for creating functional parts that have very tight tolerances.
How to improve the 3D printing accuracy? There are 10 tips given to you.
1. Consider various elements before printing
1) Attention to the accuracy of the printer itself.
When purchasing a new 3D printer, we should know its accuracy. Usually, the accuracy of a desktop FDM 3D printer is around ±0.5 mm, while the accuracy of an industrial FDM printer is around ±0.2 mm. So you should take this value into account when you choose a 3D printer. But who decides the accuracy of the printer?
Without a doubt, the materials and structures of the machine frame are critical factors. And the most widespread materials for 3D printer frames are aluminum, steel, alloy materials, plastics, carbon fiber, and wood.
The supporting structure is sorted into working parts and fixed parts. The moving parts, which have fast working speed and acute acceleration or deceleration, need to use lightweight materials, such as carbon fiber, aluminum alloy, and composite plastic. In contrast, the fixed part should use high-strength materials, such as steel, aluminum alloy, and carbon fiber.
The frequently-used supporting structure includes the I3 structure, Core XY Structure, and Delta structure. In general, in the I3 structure machine, the printing head and heat bed need lightweight. In the frame structure machine, the X-axis, Y-axis, and the printing head need lightweight. If you choose the fitted material on the relevant parts, you could increase the printing precision.
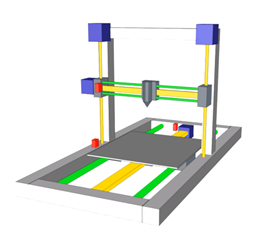
i3 Structure
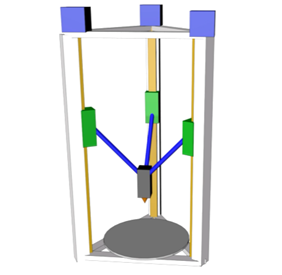
Delta Structure
from flashforge

CoreXY Structure
To test whether your 3D printer precision is accurate, you could use the calibration cubes test, The test is to print a specific cube, such as 20*20*20cm, and contrast the actual object size to your ideal object size. Please use a caliper to get precise measurements, then you will know your machine better. Typically, a new machine behaves well, so you don't need to frequently test it, attention to the long-term-used machine. In most conditions, positive dimensional inaccuracies are better than negative ones.
For desktop FDM machines precision:
Greater than +/- 0.5 mm is Bad
Less than +/- 0.5 mm is Average
Less than +/- 0.2 mm is Good
Less than +/- 0.1 mm is Fantastic
2) Choose different building plates to create various effects
Glass
It is a common type of building plate for 3D printers, distinguish from the normal glass table. Most glasses of 3D printing surfaces are tempered glass, including Carbon crystal silicon coating, which is a strengthened and thermotolerant version of regular glass that avert the plate from deforming during printing. Glass building plates usually fall into two types: smooth and textured. The former could generate a smoother bottom layer of the model, while the latter could easier take off the model when the bed cools down. Both of them could work with common filaments, such as PLA ABS, PETG, TPU, and nylon. And use a clip to help you fix the glass to the printing platform. You may also need to apply glue to the glass, ensuring that the first layer of printing parts strongly stick to the bed.
PEI
Spring steel Polyetherimide (PEI) is a recently popular build plate. This build plate is made of spring steel, coated in PEI. It is flexible and ferromagnetic, handy for adhering or removing from the bed. It often collaborates with a soft magnetic sheet and is attached to the aluminum baseboard. This building plate could also be divided into two groups, spring steel smooth PEI and spring steel textured PEI. The smooth type is easy to attach to the first layer of the printing part, while the textured PEI could readily remove the model. They are compatible with PLA, ABS, PETG, TPU, and nylon.
G10
G10 is a barely-known composite material, but with a friendly price, and
can employ sorts of filaments. G10 is very similar to carbon fiber in some physical properties but at a fraction of the cost. Plus, G10 is sturdy and extremely durable, so you won't have to worry about accidentally damaging the surface. It is compatible with PLA, ABS, ASA, PET, PETG, TPU, and nylon.
Polypropylene
Another plastic bed material worth discussing is polypropylene (PP). It is translucent plastic, at an inexpensive price. They are semi-flexible and easily be bent to remove the prints. This material is also high temperature-resistant and can even bear up to 120 °C. And because of its adhesiveness, it is a great option for printing surfaces. However, polypropylene beds are easy to scratch and may leave trails to the bottom of prints. And in some cases, it may cause warping and deformations after long-term heating. It is compatible with PLA, ABS, PETG, PC, TPU, nylon, and polypropylene.

Carbon Crystal Silicon Glass

PEI

G10

Polypropylene
3) Decide a fit object size
You may ignore an important point that the object size could also impact the printing precision. If you print a too small object, it may cause the cooling time not to be long enough between layers, and generate bubbles on the model or other modeling problems. Printing too large an object may cause edge warping, layer split, or print pieces deformation. Hence all the model sizes must conform to the printer's printing size. This part could finish by modeling software, but don't worry, you could still change the scale with a slicer later. Typically, the build size of a Desktop FDM 3D printer is 200 x 200 x 200mm, while the build size of an Industrial FDM 3D printer is 900 x 600 x 900 mm.
4) Choose the appropriate consumables
Different types of materials have different parameters. And please notice these parameters that are very helpful in your printing.
First is diameter tolerance, which means the permissible range of variation in a dimension of an object. The smaller of tolerance that the precision is more accurate.
The second is the coefficient of thermal expansion of filament, which describes how the size of an object changes with a change in temperature. Specifically, it measures the fractional change in size per degree change in temperature at a constant pressure. And lower coefficients mean a lower propensity for change in size. And the filament in each brand has different values, so you need to keep an eye on it.
But beyond that, the risk of moisture in the filament impacts precision, either. If you hear sizzling or popping noises coming from the nozzle when the filament is extruded, it means the filament is humid, so the spool needs to be dried. And please remember to store them in a dry and sealed space when you don't use them.
Lastly, the printing speed is also important. The lower speed, the precision is more accurate. See more details in the below filament introduction.
To test whether your filament is the most fitted, you could also use the calibration cubes test. On the one hand, you could check your filament tolerance. On the other hand, you could measure the flow rate of the material. Filament and extruder types could affect the flow rate.
PLA
Poly Lactic Acid is one of the most popular filaments in desktop 3D printing. It has a low printing temperature, which means it doesn’t warp easily. And it is odorless and environmental-friendly, made of renewable resources. It is used to print low-wear toys, containers, and prototype parts. Its diameter is about 1.75mm, ±0.03mm tolerance. Suggest setting 30 to 60℃ of bed temperature, and around 200℃ of the printing temperature, and the printing speed is about 40-80 mm/s. PLA is extremely sensitive, and readily absorbs moisture. When it gets damp, its diameter will be affected. Plus, it will become crisp and generate bubbles.
ABS
Acrylonitrile Butadiene Styrene is also very popular for 3D printing hobbyists. It is high rigidity, abrasion, and heat resistance, and is not readily deform during cooling. Hence ABS material is used to create automobile parts, office supplies, household appliances, toys, etc. Its diameter is about 1.75mm, ±0.05mm tolerance. Suggest setting 90 to 100℃ of bed temperature, and around 220-250℃ of the printing temperature, and the printing speed is about 40-60 mm/s. When the ABS gets damp, it will also generate bubbles.
Nylon
Nylon is a polyamide, a very durable, tough, and flexible material that can create functional prototypes, tools, or mechanical parts. Moreover, it can be dyed before or after printing. However, it can easily absorb moisture, you need to store it in a dry place. Its diameter is about 1.75mm, ±0.05mm tolerance. Suggest setting 50 to 100℃ of bed temperature, around 220-260℃ of the printing temperature, and the printing speed is about 30-60 mm/s, and recommend using an all-metal hot end. If the Nylon gets damp, it will cause an unattached problem between each layer. And it absorbs humidity at an extremely fast speed, just several hours of exposure can make it fully saturated and unusable.
PETG
Polyethylene terephthalate glycol (PETG) is a variant of PET, a polymer that is used in water bottles and food containers. PETG is commonly used in 3D printing, due to its flexibility, strength, high temperature-resistant, UV rays-resistant, water-resistant, and chemical solvents-resistant. It can be used to make food and drink containers, medical equipment, and so on. Its diameter is about 1.75mm, ±0.05mm tolerance. Suggest setting 70 to 85℃ of bed temperature, and around 230-250℃ of the printing temperature, and the printing speed is between 60 and 100 mm/s. If the PETG gets damp, it will cause stringing or oozing problems when you are printing.
TPU
TPU filament is a very flexible material, not so easy to curl or delaminate. It is also very abrasion-resistant, oil-resistant, and chemical-resistant, and could bear low temperatures. It is perfect for use in sporting goods, such as footwear, and to make instrument panels and sensors in the automotive industry and aerospace area. Its diameter is about 1.75mm, ±0.05mm tolerance. Suggest setting 25 to 60℃ of bed temperature, around 200-250℃ of the printing temperature, and the printing speed is between 25 and 50 mm/s.
PP
Polypropylene (PP) is a common household plastic, prized for its translucency, chemicals, water-proof, lightweight, durability, and fatigue-resistant. PP can be used in creating food containers and other household supplies. Please pay attention, although PP is considered a food-safe material, you need to consider other parts' safety when you print the food with a 3D printer. Its diameter is about 1.75mm, ±0.07mm tolerance. Suggest setting 85 to 120℃ of bed temperature, around 225-245℃ of the printing temperature, and the printing speed is between 30 and 50 mm/s.

PLA

ABS

Nylon

PETG

TPU

PP
5) Choose the fitted nozzle diameter
The nozzle diameter determines the width of the extruded wire, which affects the accuracy of the finished arts. We all know that 3D printing is to construct objects by layers stack. Therefore, the layer thickness is also one of the important factors in improving printing precision. When using the large diameter nozzle, the thickness of the layer will be thicker, and the 3D printing speed is faster, but the finished stuff will be relatively rough. Conversely, when using a small diameter nozzle, the 3D printing time will increase, but the finished product is more refined. Generally, the nozzle diameter is 0.2mm, 0.3mm, and 0.4mm. It can not be smaller, because of the flow property of non-Newtonian fluid of consumables, and too small a diameter will cause excessive flow resistance.

MK10 Nozzle 0.3/0.5/1.0 mm

UM2 Brass Nozzle 0.4mm
2. Use slicing software to adjust parameters
A slicer is software that converts a 3D model into the instructions (known as G-code) that drive the printer. The slicer could control a number of important parameters, such as model size, wall thickness, layer height, infill density, print speed, retraction speed, support structure, printing temperature, build plate temperature, and flow. Please remember to add some basic information before you set, such as your 3D printer, material type, and nozzle diameter. Let's take Ultimaker Cura as an example.
3) Set the right model size
As we mentioned in the preceding text, you could freely change the object size by the slicer. Choose the model file, click the "Scale" on the left side, then drag the model to magnify or shrink, attention doesn't surpass the printing area.
6) Set the delamination thickness
The delamination thickness is also called layer thickness or layer height. Because each layer has a certain thickness, an obvious step pattern will appear on the object's surface after forming. The higher the layer thickness, the step pattern more obvious. And it will highly affect the dimension and surface roughness of the formed solid. It is impossible to eliminate the step completely but can be reduced by setting a small layer thickness. The layer thickness is recommended to set to 30%-50% of the nozzle diameter, not exceed 70%. Therefore, a 0.4mm nozzle can build a 0.28mm layer at maximum thickness.
7) Set the infill density
Infill density refers to the amount of filament used on the inside of a print. A higher infill density means that there is more filament on the inside of your print, leading to a stronger object. In slicers, you could set a value between 0% to 100%. Amount of them, 0% means a hollow model, 20% means a visual model, and 100% means completely solid. Please remember that the higher the infill density, the less flexible the part will be.

from 3D PROS
Grid: Strong 2D infill, consumes an average amount of material, and takes a middling time to complete.
Lines: Quick 2D infill, doesn't consume too much material and owns lightweight.
Triangles: Strong 2D infill.
Tri-hexagon: Strong 2D infill.
Cubic: Strong 3D infill, but consumes more material and time than others.
Cubic (subdivision): Strong 3D infill, saves material compared to Cubic.
Octet: Strong 3D infill.
Quarter cubic: Strong 3D infill.
Concentric: Flexible 3D infill, very quick to print, good for flexible parts, and consumes less material.
Zig-zag: A grid-shaped infill, printing continuously in one diagonal direction.
Cross: Flexible 3D infill.
Cross 3D: Flexible 3D infill.
Gyroid: Infill with increased strength for the lowest weight.
Lightning: Only supports top surfaces infill and could print very fast.

from Ultimaker Support
Suggest using Lines and Tri-hexagon patterns when you build the general models. And use Gyroid or Lightning when you don't have the request of rigidity, and want to improve the printing speed.
8) Set the print speed
Print speed determines how fast the motors of your printer move, including the motors controlling the X- and Y-axes, as well as the extruder. (As we all know, there are Bowden Extruder and direct extruder, want to know more details please look at another Blog: The Most Important Parts of 3D Printer - Most detailed introduction)
Printing too slow may cause print deformation. While printing too fast may cause overheating artifact ringing, under extrusion, as well as weak layer adhesion.
Typically print at 60-100 mm/s and adjust by 5-mm/s increments. If the printing quality is pretty good, you could increase the print speed. However, if you meet some trouble, then try to slow down the speed. When you set the print speed, these several secondary settings will change automatically together. You could follow the default value or change them slightly to get a better printing effect.
a) Infill speed: This setting adjusts the print speed of the infill for the model. It's typically the same as the print speed.
b) Inner wall speed: This setting can adjust the speed of the inner perimeters for the model, typically the same as the overall print speed to decrease print times while maintaining print strength.
c) Outer wall speed: This setting adjusts the speed of the outermost perimeter for the model. It can be decreased slightly to improve surface quality.
d) Top/bottom speed: These settings adjust the speed of the top and bottom surfaces for the model, typically decreasing slightly to improve surface quality.
9) Set the retraction speed
Retraction speed is used to adjust how fast the printer pulls filament back before travel moves. It is an essential setting for reducing stringing and improving print precision. If it's too slow, may be left with ungainly strings and spots on your print pieces. While too fast speed may appear filament grinding, stringing, and bubbling.
In Bowden extruder, suggest set the retraction distance between the 2mm to 7mm, increase the retraction distance by 1mm to see whether the performance improves. And please remember that the distance should not be exceed the length of the nozzle. The ideal retraction distance of the Hurakan is 7mm. And the retraction speed should be 45mm/s to 70mm/s, and adjusting by 5mm/s increments to observe the printing process.
In direct extruder, suggest set the retraction distance between 1mm to 3mm. And the retraction speed should be 25mm/s to 45mm/s, and adjusting by 5-mm/s increments to observe the modeling process.
10) Set the support structure
Some models have overhanging parts, you need to print a support structure under the model to prevent the filament from falling down. This can be realized by enabling "Generate support". There are a few settings you need to be concerned about.
a) Choose the support structure: There are two support structures in Ultimaker Cura, "Normal" and "Tree". The "Normal" generates supports directly below your model and can be used in all complex printing profiles. In contrast, "Tree" creates branches that grow around your print, a better method to reduce print time and fewer flaws in the model. You need to consider which one is more suitable for your work.
When should I need a support structure? There are two tests that could figure it out.
First, 45°rule (overhangs): If the overhangs are greater than 45°, with respect to the vertical, then will need support. Use the overhang test to check the overhang capabilities of your printer. Second, the 5mm rule (bridges): If bridges are more expansive than 5 mm, they may need support. Use the bridging test to determine when your printer needs support.

from Gambody
b) Next setting is Support Placement, selecting from "Everywhere" or "Touching Buildplate". "Everywhere" fits in building a complicated model, while "Touching Buildplate" is only originating from the build plate.
c) Set the Support Overhang Angle, which is decided by the mentioned test before. The default angle is 45°but may be different for various 3D printers and printing needs. If you only want to support bridges in specific parts, you could select 90°. If you want support for every overhang, please select 0°.
d) Set the support pattern
Zig-zag is the fastest to print and simplest to remove.
Lines are stronger than zig-zag and don't usually pop off in one piece.
Concentric is best for sphere or cylinder models, slightly stronger than the zig-zag and lines.
Grid and Triangle are very firm supports, and resilient against vibrations. however, they will take more time to print and remove.
Gyroid is lightweight and easy to eliminate.
Cross is more elastic, work with support, but can't realize filling.
e) Set the support densities: Start to 20% support density, and adjust this value according to your model. High-density support structures are generally more rigid and can withstand vibrations, but consume more filament and printing time, and are hard to do the post-processing. While low-density support structures are ideal for saving filament cost and reducing the print time and are very handy to remove.
11) Set wall thickness
Typically, the wall thickness approaches three times of line width, and the line width is roughly equal to the nozzle diameter. For example, if you use a 0.4mm nozzle, then the line width should be 0.4mm, and the wall thickness should be 1.2mm.
12) Adjust the Printing temperature and Build plate temperature
According to the preceding text, different filaments require different temperature settings. Use the recommended values at first, and then regulate them based on the real conditions.
13) Adjust the Rotation distance
Stepper motor drivers on Klipper require a rotation_distance parameter in each stepper config section. The rotation_distance is the amount of distance that the axis moves with one full revolution of the stepper motor.
Step1: Run out the remaining filament in the printer's hot end.
Step 2: Find the extruder area in the configuration file, "rotation_distance" represents the length of the moving consumables in one revolution of the motor.

Step 3: Set the printer to relative mode using the "M83" command.
Step 4: Preheat the printer to the printing temperature of the test filament.
Step 5: Feed the test filament into the printer.
Step 6: Using a meter rule, measure a 110mm segment on the filament which enters the extruder. Mark the point using a marker pen.
Step 7: Send "G0 E100 F100", extrude the filament by 100mm.
Step 8: Measure the filament from the entrance of the extruder to the 110m point marked earlier.
If the measurement is 10mm precisely (110-100), then the printer is calibrated correctly.
If the measurement is over or under 10mm, then the printer is respectively under-extruding or over-extruding.
To solve under extrusion, we need to decrease "rotation_distance"; And to address over extrusion, we need to increase "rotation_distance".
Step 9: Find the exact value of "rotation_distance" xxxx exact rotation_distance = (old rotation_distance × actual extrusion length) / 100
Step 10: Modify "rotation_distance" in the configuration file to the exact value calculated by the actual measurement, "SAVE & RESTART" to save and restart Klipper to make the new configuration take effect.
Now you've successfully calibrated the rotation distance!
14) Adjust the flow
Flow refers to the volume of filament that passes through the extruder, related to the nozzle diameter. In general cases, the default flow is 100%. However, it is not universal, and you have to calibrate the flow rate and reset it. The test procedures are below.
Step 1: Download the test file from Thingiverse and import it into Cura
Step 2: Open the print settings to make the following adjustments.
Set the layer height to 0.2mm
Set the line width to 0.4mm
Set the wall thickness to 0.4mm
Set the wall line count to 1
Set the infill density to 0%
Set the top layers to 0 (to make the cube hollow)
Then, slice the file.
Step 3: Print out the file, and use the digital caliper, measure the line width of four sides of the print. Calculate the average value of wall width.
Step 4: Calculate the new flow rate using this formula:
New flow rate (%) = (slicer wall thickness÷actual average line width)×100
For example, if you measured 0.45, 0.46, 0.48, and 0.44.
Add up to equal 1.83. Divide 1.83 by 4 to get the average is 0.458.
New flow rate = (0.4÷0.458)×100 = 87.33%
Step 5: Set the new value in "Flow" of "Material".
3. Adjust important parameters during printing
These parameters could also be changed according to the actual needs during the printing process, by the control board or your 3D printer. They are printing speed, printing temperature, build plate temperature, and flow.
15) Adjust the nozzle height
Typically set the nozzle height is 0.2mm. And you could also put an A4 paper on the plate to judge the distance between the nozzle and the building plate to test whether the extruder could work well.
4. Post-process after printing
16) Be careful polish and paint
When you finish your printing, don't miss the post-process. It is the last step to making your model more exquisite. There are two mentions to do the polish. First is to smear or soak the surface with chemical reagents such as acetone, which will make the surface of the model smoother and eliminate some of the laminated striations, but at the same time, some details will be slightly erased. The second is physical polishing, using sandpaper. The tool can also be used to remove the laminated striation. However, this manual grinding can be selectively or regionally polished, retaining important details and making some surfaces smoother. The painting part is easy, either. You could use some paint spraying and coating to add some beautiful colorways to your model.
In the end, hope you enjoy every fantastic creation! Practice makes perfect!
Where Can I Get more Information?
3D printers are hot selling around the world. Here are the BIQU Community, and Download Center, where you can search about 3D printers' news or problems solution. If you have any questions, welcome to submit a request to our official website, we will soon settle your problem.
Community & Free 3D Model Files https://biqu3d.com/pages/community
Download the Firmware File https://biqu3d.com/pages/download
Submit a Request https://biqu3d.com/pages/submit-a-ticket
Now there are some general tips for you!
1) You could ask for some advice from a person whom you know, with a fund of professional 3D printer knowledge.
2) If you want to purchase BIQU products, welcome to view BIQU Store!
3) There are some labs, workshops, and maker spaces, where 3D printers are available for trial.
4) You should choose the fittest 3D printer on your own eventually. Considering your demands, work environments, and finances.
5) Whichever company or products you would like to select, please remember to know their sales service and technology support, and even the quality of the accessories and filaments, for they may be an expensive payment.
What's more
If you would like to learn more about the technique and trend of 3D printing and get first-hand information about our new arrivals or discount, you could subscribe to our newsletter!